Getting Started
This page provides a simple example use of the Data Relay block to help you get started. The diagram below shows how the Data Relay block forwards data to a cloud messaging service. On the left is a balena device with three containers, where a data producer publishes data to MQTT on some topic to which the Data Relay block subscribes. The Data Relay block then applies a user supplied configuration for a provider's message queue service to forward the data out -- to AWS SQS, Azure Event Hubs, or Google Pub/Sub.
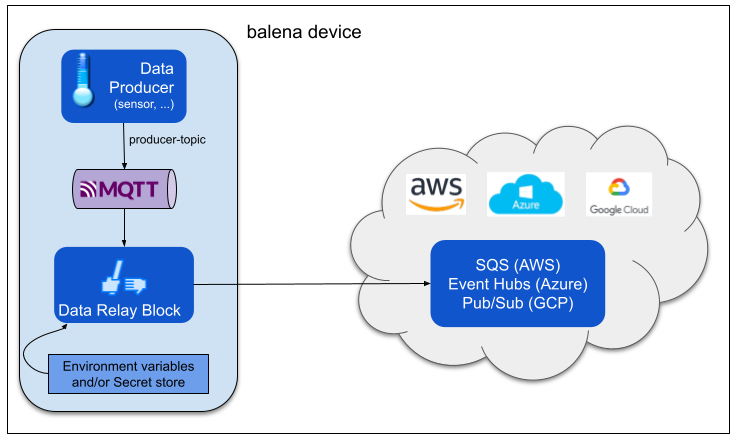
Follow these steps to implement the data flow in the diagram.
- Define a data producer and Docker Compose script for the services on the device
- Create a balena application and configure variables
- Push the Compose script to build and run the containers on the device
To help you get started, the CPU Temperature example application implements the first step. In this example we use a data producer that takes temperature readings from the device's CPU. These readings are readily available from most devices and don't require special setup.
For this guide, we then send the readings to AWS Simple Queue Service (SQS) as JSON data messages. However, as you can see on the Message Queues page, you also may send these messages to Azure Event Hubs or Google Pub/Sub by defining the application variables required by each service.
Define device services
As shown in the diagram above, our first goal is to push data to a producer topic on an MQTT broker on the balena device. We then wire the Data Relay block to subscribe to the producer topic.
As shown in the Docker Compose script for our example application, you must define three services, also shown in the table below.
| Service | Notes |
|---|---|
| data_source | Your service to produce data and publish to an MQTT topic |
| mqtt | Generic broker implementation, like eclipse-mosquitto |
| data_relay | balena block service that subscribes to MQTT messages from data_source |
Later you will push these service definitions to balenaCloud as a balena application. Alternatively you may push the services to your device locally during development, as described in the balena Develop Locally instructions.
Data producer topic
For our example application, data_source/main.py takes a temperature reading every 30 seconds, and publishes the reading to the cpu_temp MQTT topic. We will adapt the Data Relay block below to subscribe to these messages.
Create balena application
From your balenaCloud account, create a Microservices or Starter application as described in the balena Getting Started instructions. Next, you must define variables for the application that configure the Data Relay block -- either in balenaCloud or via the balena CLI.
The table below describes the variables required for the AWS Simple Queue Service. To use the Azure or Google Cloud message queues, see the Message Queues setup page.
SQS variables
| Variable | Notes |
|---|---|
| AWS_SQS_QUEUE_NAME | Name of the SQS queue to receive data messages. |
| AWS_SQS_REGION | AWS region in which the queue is defined |
| AWS_SQS_ACCESS_KEY | IAM access key ID |
| AWS_SQS_SECRET_KEY | IAM secret key for access key |
See the SQS Developer Guide for help setting up the queue service on AWS. See the IAM User Guide for help setting up the identity that allows SQS to accept messages from the balena device. The IAM User must be assigned at least the SQS SendMessage permission.
Data Relay block variables
These variables configure the Data Relay block itself, and do not depend on the cloud provider.
| Variable | Required? | Notes |
|---|---|---|
| RELAY_OUT_TOPIC | Y | MQTT topic for sending producer data out to the cloud. Defaults to relay-out. Set to cpu_temp for the example application. |
| DAPR_DEBUG | N | Define as 1 to write debug messages to the data_relay service log |
Push app to balenaCloud
Once you have defined the application, push the device service definitions from the first step above to balenaCloud with the balena push <app-name> CLI command. See the balena Getting Started instructions for details.
After a device has downloaded the app services, its logs will show output from setup, and then it should show data being pushed to the cloud, like below.


